BAS Reconciliation Checklist for Xero
BAS Reconciliation Checklist for Xero
Have you recently moved across to Xero and still figuring out how to navigate the software? Wish you had a guide for processing your Business Activity Statement efficiently?
We have been working with Xero for over 14 years and have created a guide that we follow before we lodge any BAS’s with the Australian Taxation Office. This process ensures we have reviewed everything required prior to lodgment.
The following provides an explanation behind our in-house checklist which you can download as a pdf and tailor to your needs.
This is ONLY a guide and remember that the ultimate goal of yours is to create the best process that is complaint and works for your organisation.
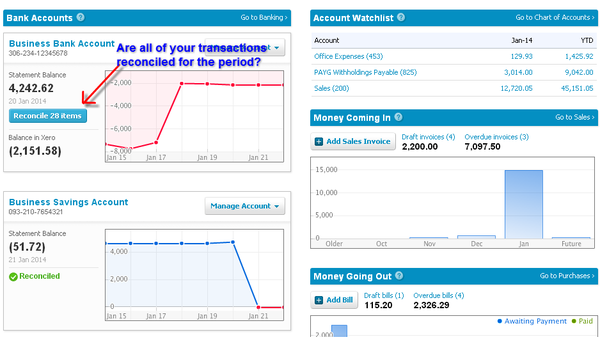
Are the Accounts On The Dashboard Reconciled?
Have you reconciled all of the accounts in Xero and made sure that all the bank accounts, credit cards and PayPal are up to date? Follow these simple steps in order to ensure your reconciliation is complete.
- Go to your Dashboard, select the account you want to reconcile and click on the button “Reconcile X items”. If there are no items dated for the period unreconciled then this area is cleared. If there are items in here go ahead and reconcile.
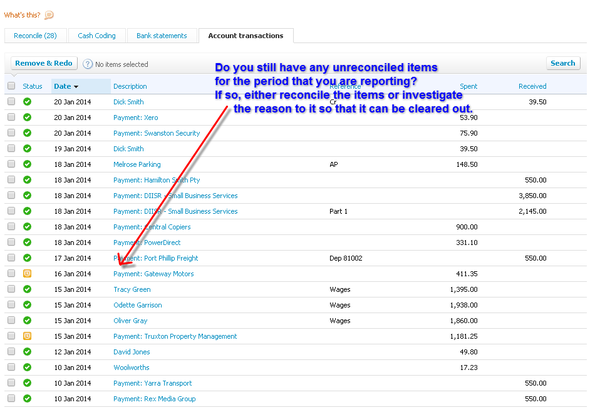
- Go to the tab “Account Transactions” and check that you have no items sitting in here as unreconciled for the period. If there are unreconciled items in this area make sure you find out why they are here. Could it be a double up of a transaction? Could it be a transaction created manually by mistake or against a wrong account? Clear these out as appropriate in order to complete this step.
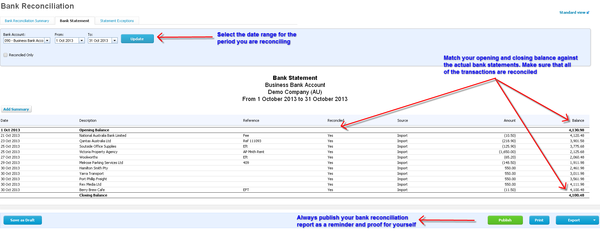
- Go to the “Manage Account” button and select the “Reconciliation Report”. Select the “Bank Statement” tab and select the date range for the period you’re reconciling. We recommend you to do this month by month in order to compare this with the actual bank statement.
Firstly select the date range you want to check the bank reconciliation, compare the opening and closing balance with the bank statement for the same period and make sure that all the transactions under the header “Reconciled” says YES. If there is something saying No, then make sure that you reconcile that specific transaction or remove it if it shouldn’t be there. Your last step is to publish this report so that you have a small reminder in the Xero “Published Reports” tab on where you are at with your reconciliation. We name the report with the name of the bank and then with the name of the month and year that has been checked.
Review The General Ledger Detail Report
Go to the “Reports” tab and select the “General Ledger Detail - Account Transactions with Tax Rates” report. Exclude bank accounts, credit cards, bank clearing accounts & GST. Select the appropriate date and if you are reporting on Cash basis to the Australian Taxation Office make sure you tick the “Cash Basis” button under 'more' so that you view the correct transactions. The reports in Xero default display on “Accrual” basis as a default. If you have a lot of transactions in the period you are reporting I would recommend you to look at this on a month by month basis instead of all in one go.
Review the transactions and ensure they have been coded to the correct account with the correct GST allocation as per the source documentation.
Review The Business Activity Statement
The Activity Statement includes two reports, 'Transaction by Tax Rate' and 'Transactions by BAS Field'. We recommend you look at this report in order to review what account your transactions have been coded to and to make sure that you have chosen the correct allocation and GST tax code.
If you find that there are a few transactions that have been coded to either the wrong account or with wrong GST tax code then process the changes accordingly:
Right click on the mouse while on the transaction you want to change and open link in a new tab. The reason you do it this way is that otherwise Xero will take you to another screen and you’ll have to go back to the report every time you’ve changed something.
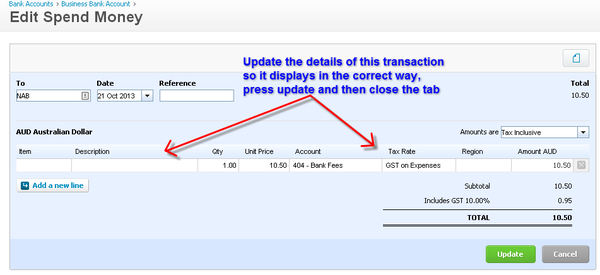
- Spend or receive a money transaction, click on the “Options” button and select “Edit”. Xero will allow you to make changes to any field in that transaction. Make sure you press the save button in the end and close that tab. If you want to check that it made the changes press F5 while in the report.
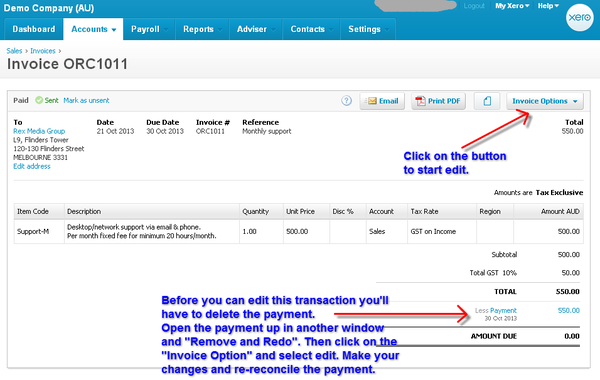
- If your transaction is related to an invoice or bill then there is another process to go through in order to make your changes. Right click on the mouse while on the transaction and open link in a new tab. Then click on the invoice number that is displayed in blue. It will take you to the invoice and from there if you need to change the account code or tracking category select the “Invoice Option” button and click “Edit”. Make your changes and save. When finished close the tab.
If you need to change the Tax Code or anything other than the above the are two options to amend: Find & re-code or removing the payment. Below we will explore removing the payment.Right click on the mouse while on the transaction and open link in a new tab. Then click on the invoice number that is displayed in blue. It will take you to the invoice and you will see the payment displayed in blue. In some instances you are able to edit the transaction without removing payments allocated against the invoice. If you need to remove the payment complete the following, right click again on the mouse and open the payment in another tab. You will have to make on note on the payment date and reference if you’ve used one and then press the “Options” button and select “Remove and Redo” the payment and close the tab. Then refresh your tab where the invoice is located with F5 and click on the button “Invoice Options” and “Edit”. Make your changes and save. Also remember to add the payment back either manually from here or go to the reconciliation area to re-reconcile the transaction again.
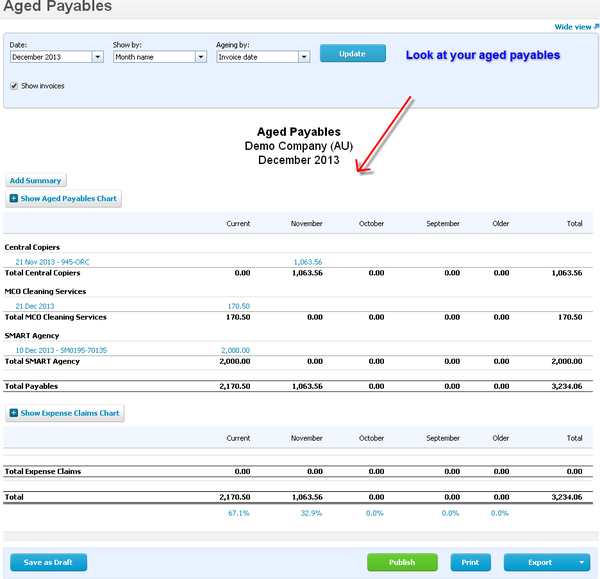
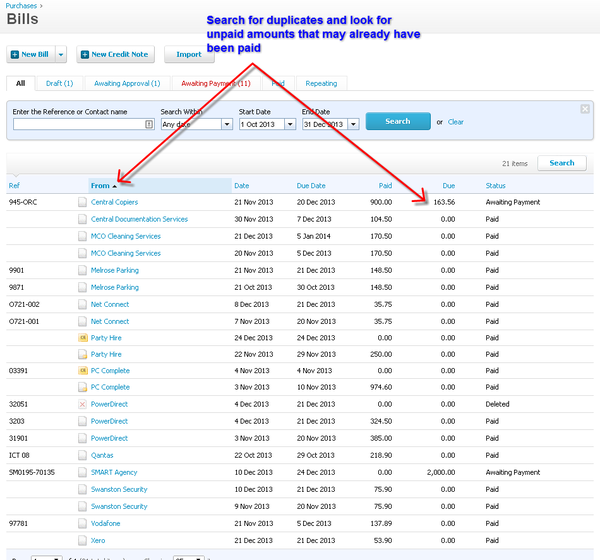
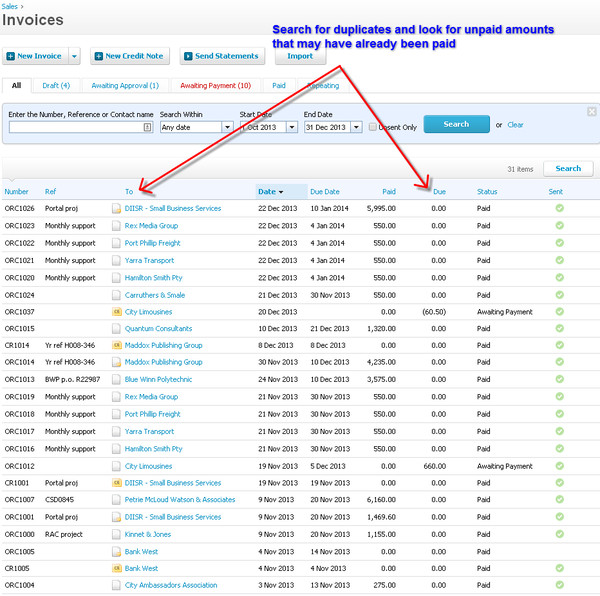
Check Your Accounts Payables
Always make sure you check your accounts payables so that all the information in this area is up to date.
We advise you to have a look at the report “Aged Payables” as at the last month in the period. If you have lots of bills coming across in the payables, for more detailed checking we advise you to go to the “Accounts”-”Purchases” select “See All” and press search. Put in the date range for the period you are reporting. Sort the bills by clicking on “From”. Check for duplicates and look for unpaid amounts that might have already been paid. This is your chance to clean up the bills.
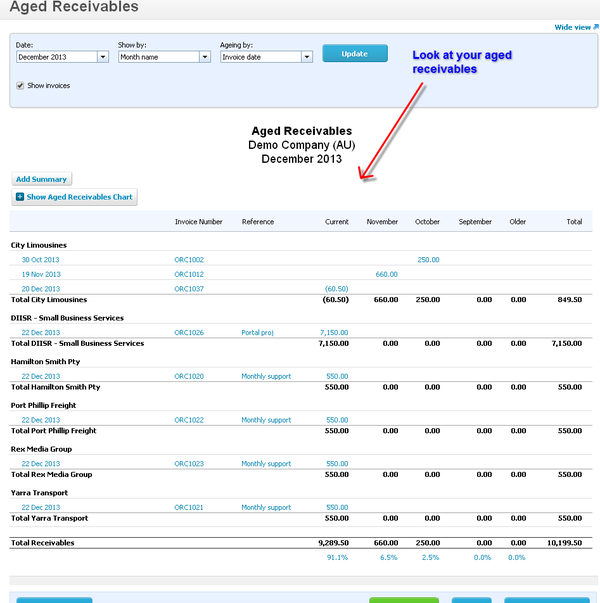
Check Your Accounts Receivables
Always make sure you check your accounts receivables so that the information in this area is updated. We advise you to have a look at the report “Aged Receivables” as at the last month in the period. For more detailed checking, if you have lots of invoices coming across in the accounts receivables, we advise you to go to the “Accounts”-”Purchases” select “See All” and press search. Put in the date range for the period you are reporting. Sort the bills by pressing “To”. Check for duplicates and look for unpaid amounts that might have already been paid. This is your chance to clean the invoices up.
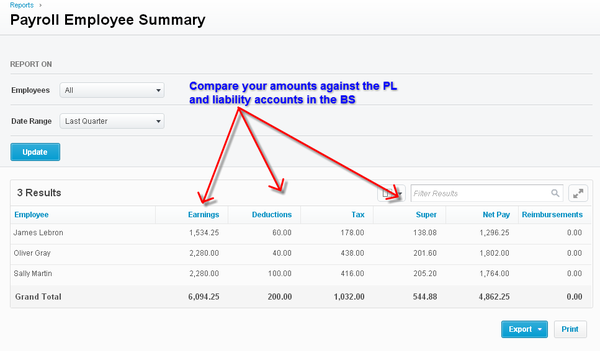
Balance Your Payroll
Make sure that the payroll is matching the profit and loss report. Create the necessary adjustments if needed. If you have to do any changes in the payroll always create a new “Unscheduled Payrun” to avoid to make errors in payruns posted in prior periods. Ensure STP lodgments are accurate and up to date.
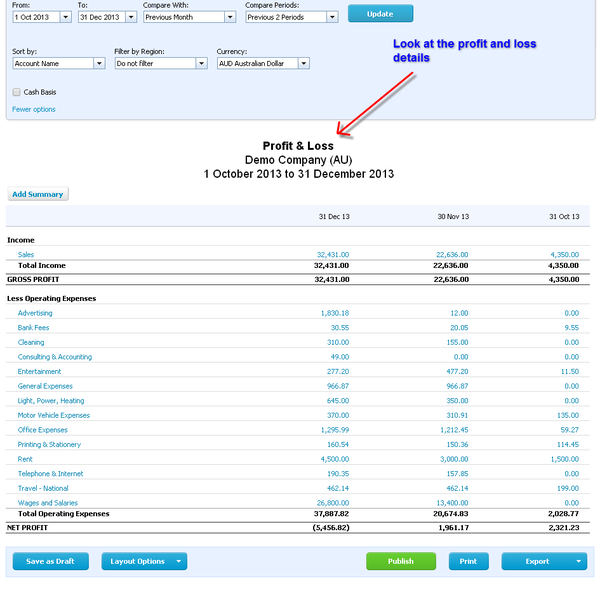
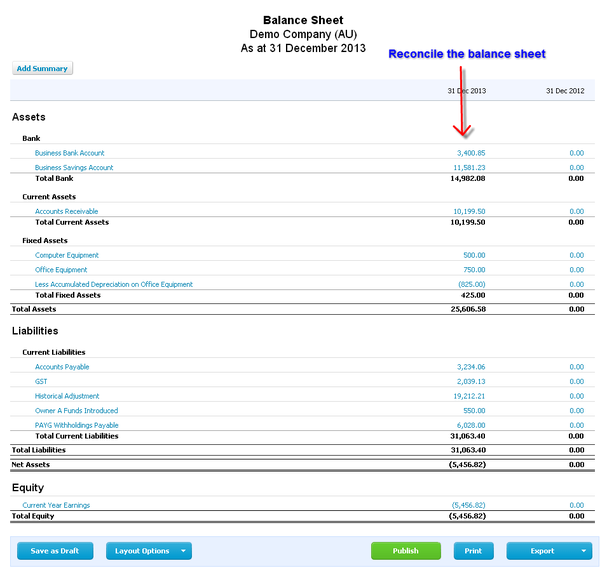
View Profit & Loss And Reconcile Your Balance Sheet
This step gives you the chance to look at your profit and loss statement in order to compare the different accounts with previous periods. Reviewing any large variances from prior period to review for accuracy and consideration. Reconcile your balance sheet so that your asset and liability accounts are updated.
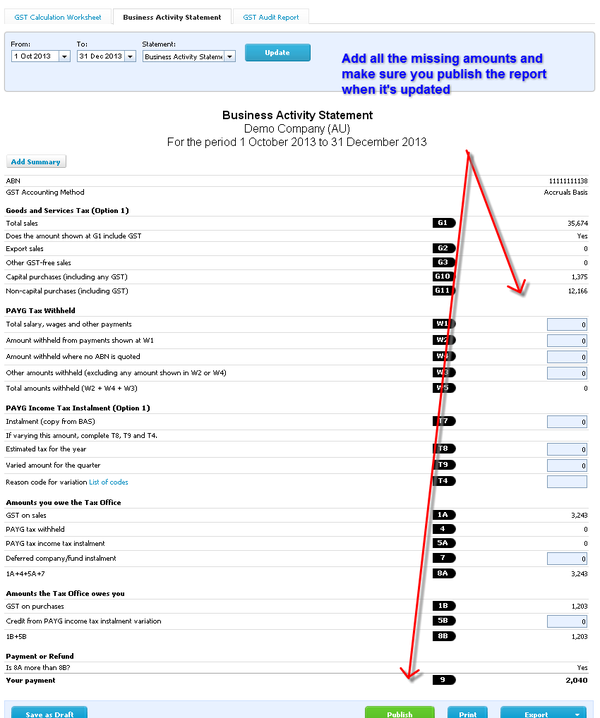
Update The Figures On The BAS
In this step you will have to update the figures on the Xero business activity statement such as payroll lines W1 and W2 etc if they have not pulled through from Payroll. All these areas that are not yet linked through the Xero reports needs to be added manually. Always press the “Publish” button when this is done so that you have a copy in the system and that the report “GST Reconciliation” automatically gets updated.
Publish The Reports
When you have completed all the above steps, amended transactions that have been coded wrongly and everything is updated we recommend you to finally publish the report “Detailed Account Transaction” and any other reports that is relevant for the organisation.
Lodge your BAS with the ATO
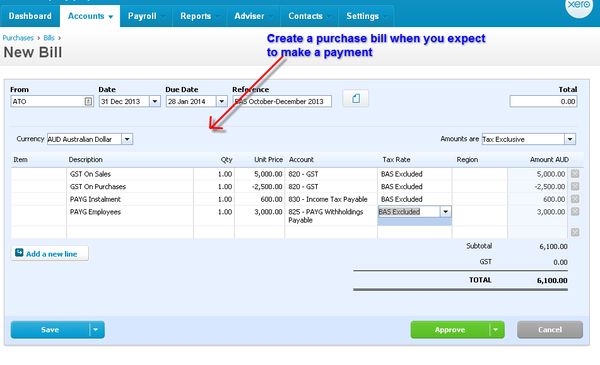
Yes! We are finally all done with the BAS checking and can lodge the business activity statement with the Australian Taxation Office. If you need to make a payment to the ATO we recommend you create a purchase bill for the amounts payable to save the time when the bankfeed for the payment comes across. If you expect a refund from the Australian Taxation Office we recommend you create a credit note purchase bill for the amounts credited back in order to save time when the bankfeed with the refund comes across. Date the purchase bill and the credit note as per the last day on the period you are reporting and add the due date of when the payment needs to be made.

Lock Your Financials
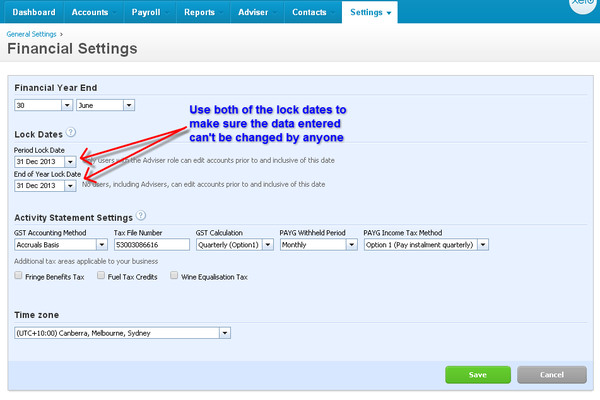
To avoid anyone or even you yourself making changes to this business activity statement or any data in the past we advise you to lock your file up to the last day in the period. In this case we would go to the tab “Settings”, “General Settings” and select “Financial Settings”. Put in the date 31 December 2013 (or the last date of reporting period) in both the “Period Lock Date” and “End of Year Lock Date”. Make sure you press “Save”.
Pay The ATO Or Expect A Refund
Well done! Now you have completed our simple guide of how to complete a business activity statement so that you minimise any errors and make sure that you are compliant. Feel welcome to use this as a base and tailor it to fit with your way of completing Bas’s.
Related Articles
Using Xero
Paid Bill or Invoice Showing an Amount Due You may find that an invoice/bill is showing as unpaid even though there should be $0 amount due. All of your reports are displaying the correct balances but when you view this particular invoice/bill it ...Changing GST Basis in Xero Post Conversion
Table of contents Changing GST Basis in Xero Post Conversion Changing your GST accounting basis—whether post-conversion or in the future—can significantly impact your GST reporting history. For example, switching from Cash to Accrual will shift GST ...GST Reconciliation Post Conversion
Publish your BAS for the period before your conversion date Run and publish the older BAS, or finalise the new Activity Statement for all periods prior to your conversion date that contain transactions with GST. Please select 'Lodge Reports Outside ...Bank Reconciliation Post Conversion
How to deal with the reconciliation post-conversion can vary depending on how up-to-date the accounting data file was when it was uploaded for conversion. In addition, whether you ordered a history versus balances service will influence when you need ...Running Payroll Reports Post Conversion
When setting up payroll in Xero, most employees will have opening balances so that payment summaries can be created out of Xero easily. The downside is that the reporting for the first quarter/ month after conversion does not easily give the correct ...