Reckon (AU)
What Versions of Reckon do you Convert?

What is Converted?
- Contacts
- Chart of Accounts
- Inventory items
- Classes
- Open invoices & bills
- Closed Invoices & Bills for the Transactional Period Converted
- Transactions
- Payroll - if maintained in the file
System Differences and Conversion Information to be aware of
- In some instances in Reckon a transaction may be linked to a job report however when looking at the transaction in Reckon there is no job listed. In these instances you may experience a variance in the Job profit report.
- Jobs/ categories and classes convert into Tracking in Xero.
- Tracked Inventory needs to be setup post conversion.
- Xero does not allow general journals and payment unallocated to invoices and bills to customer and suppliers. Therefore we assign these to a non system Accounts Receivable and Payable account.
- We aim to convert tax codes in a per the source file though with Reckon sometimes the tax codes will all convert as BAS Excluded.
- We do not process Multicurrency.
Reckon Desktop
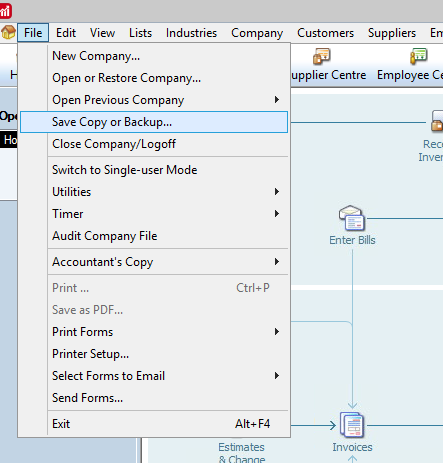
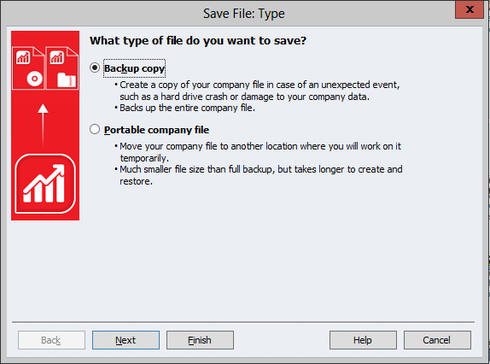
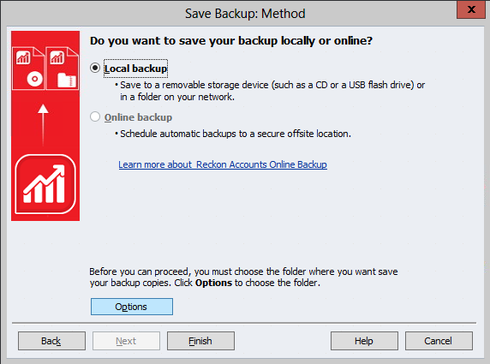
Creating a Back-Up
How to Clean Up my Reckon File


- Remove the password
- From the toolbar select Company> Change Your Password
- Check the user is admin and the new password is blank. If you have a password it will ask you for it.
- Set the closing date: The closing date is technically the Start date from which you want transactions converted, not the date of the last transaction in the file. To convert transactions from 1 July 20XX, set the closing date to 30/6 of the same calendar year. EG - To convert transactional history from Reckon to Xero from 1 July 2023, set the closing date at 30/6/2023.
- From the toolbar select "Company"
- Use the drop-down to select "Set Closing Date"
- Click on Set Date/Password. Selected the closing date of your choice ie 30/06/XX. Remember this will 'close' transactions prior to this date.
- Clean up the file:
- From the toolbar select File
- From the drop-down select Utilities
- From the expanded options select 'Clean Up Company Data'
- Click Yes at the 'Budget data may be removed during cleanup. Do you want to continue anyway?'
- Select 'remove transactions as of a specific date' this is the same as the closing date (for example 30/06/20XX). Please note this will remove transactions prior to this period and is why we recommend doing this process on a backup copy.
- Select Next
- Tick all boxes then click next.
- Tick all boxes then click next.
- Click 'Begin Cleanup'.
Reckon Hosted
How to Create a Back-Up


Follow these steps to save your backup to your computer.
- Click on the download icon located on the top right-hand corner of your screen
or
- Click on the “Look in:” drop-down menu and select “My Backup (B:) “ where your hosted backup sets are stored by default
- Select your Backup File or Portable Company file you want to make a local copy of
- The Reckon Accounts Hosted download function will automatically download your file to your web browsers default download folder location.
From here, you can load through our website for conversion.
How to clean up my Reckon Hosted File
File > Utilities > Clean up company data Clean up the file by purging transactions prior to your chosen date.
Remove all transactions prior to your chosen date.
Uncheck "Remove uncleared (unreconciled) bank and credit card transactions."
Remove the ''done' to do' notes. You may also wish to check the box for the unused accounts/customer or suppliers.
Select Begin Cleanup
Put the backup into a subfolder. Select OK
At this stage also go through the complete verification.
Click Save.
If you receive this error, some additional account fixing may be required. See the steps below.
It is best to save as a QBW or QBB you can then reopen the file to check that all the data you are wanting to convert is still in it prior to starting a conversion.
Reckon then asks where to save the working copy. Save in a directory and call it something unique so that it is clear that this not your working file. Once you have verified the data this is the file to upload. Be sure to remove any passwords.
Errors - How to Fix Various
Common Errors and How to Handle Them
- Clean-up date set too early. See Example 1
- Error Templates - See Example 2
- Changing Admin Password. - See Example 3
- The accountant’s Copy may need to be cancelled for purging. - See Example 4
- Clean-Up Date
Set the date for clean up to be the end of the financial year that you do not need data for to retain only the relevant data. Open invoices etc will still come through.
Clean up date may be set before 30/06/2014. Edit > Preferences > Accounting > Company > Set closing Date > Ok - Errors in Templates
In the rebuild, you may get errors in the Templates file. You need to find those errors and then delete the templates.
Might need to do a re-build of the file which recreates indices and relationships. This is an example of a failure - duplicate elements.
The log file showed there were 2 invoices called "custom invoices"
Following this up discovered that there were 2 templates called “custom Invoice” (Will need to track these errors to see what are common ones).
Deleting 1 solves this problem - Change Password to Blank
Company, Change Your Password. Please supply the file with a blank password. - Change from Accountants Copy to Business
Sometimes the file will have had the accountant’s Copy set. You need to go and cancel that process to enable cleanup.
File > Accountant's Copy > Client > Cancel
Requires Confirmation

Reckon Accountants Version - How to Downgrade a File
If you have a Reckon Accountant file, we need the file to be saved from a business version of Reckon (Pro / Premier / Enterprise). To do this, please follow these steps:
- Open the Reckon File in the Accountant version.
- From the file menu, choose toggle to another edition (e.g. Premier General Business).
- Save a backup copy of the file.
- Whilst still toggled, restore the back-up copy, this is now ready to upload to us.
Conversion Process
Step 1: Tidy up
Step 2: Register your details
- Start the conversion via our website.
- Select Upload Your File
- Fill out your details and click Proceed.
Step 3: Select your package
Step 4: The conversion commences
- We will extract the data from your Reckon file
- Premium Package Optional - Bank Mapping - see here for more on Bank Mapping
- The Conversion will be completed and to you in 5 business days. We will contact you if it looks like it might take longer.
Related Articles
MYOB Desktop (AU & NZ)
What is converted? Contacts Chart of Accounts Inventory Items Jobs / Categories / Classes Open Invoices & Bills Payroll (AU Only) Transactional History (dependent on package selection) What isn't Converted? Multi-currency. Native Currency must be the ...Quickbooks Enterprise / desktop (US)
What is Converted? Contacts Chart of Accounts Inventory items Jobs / Categories Open invoices & bills Closed Invoices & Bills for the Transactional Period Converted What isn't Converted?: Multi-currency. USD must be the only currency. Inventory ...What are the steps involved in doing a conversion?
This procedure is for our regular conversion service where we create the Xero Organisation and transfer it to your nominated Xero subscription email address. If you wish to convert into an existing Xero Organisation please see this knowledge base ...Trouble Uploading Your Desktop File?
Trouble Uploading Your Desktop File? Here’s How to Fix It If you’re experiencing issues uploading your accounting file, don’t worry—here are a few troubleshooting steps to help you resolve the problem: 1. Use a Supported Browser For the smoothest ...How to Backup your file
How to create a MYOB File backup Firstly, open your MYOB file. Click on the File menu, and go down to Back Up If prompted please make sure that you Backup Company File only. From here, you will get a new Pop Up box prompting you to select where to ...
